Although Raspberry Pi’s are not the most logical choice for a media server, they are fun to tinker around with. I set up Plex on my Raspberry Pi and use NordVPN’s meshnet functionality to access my server from anywhere.
Installing OS and connecting
I used a 16GB SD card to flash a headless OS on (for efficiency and since I do not have micro HDMI laying around…). After some tries setting up OMV, I wasn’t able to connect over LAN by editing the wpa_supplicant.conf file. Therefor I chose old faithful Raspbian OS (64bit) instead.
Since the Raspberry used is a Model 4B 8GB, a hyper-optimized OS to play video is not detrimental. Moreover, transcoding is not going to happen unless I submerge the board in demineralized water (which I won’t).
I used the Windows app to flash the card and put in my Wi-Fi credentials. I used nmap to find the IP address of the Pi.
Mounting a USB device
Our media files will be stored on a USB device, which I want to mount. I identify the path of the USB device with fdisk -l. Then I format the drive to ext4 with sudo mkfs.ext4 /dev/sda (I read mounting with NTFS formatting is not optimal). I identify the UUID with ls -l /dev/disk/by-uuid/, make a directory with mkdir /mnt/usb1 and add the USB UUID to fstab to always mount this device to the same directory.
 |
|---|
UUID=XXX /mnt/usb1 ext4 defaults,auto,users,rw,nofail,noatime 0 0 |
It is important that the owner of the directory is the same as the Docker user, or the containers will not have the correct permissions to read/write files after mounting this USB device. I use chown -R pi:pi /mnt/usb1 and use the GUID/PUID corresponding to this user (use id to see this) as environment variables in the docker-compose templates later on. See also the linux server docs.
Setting up networking
To make my life easy, I set up static DHCP for the Pi Mac. I also added a DNS entry so that I can access the Pi using raspberry.lan while on the home network. On the Pi itself, I disabled Wi-Fi because I am using Ethernet by adding an dtoverlay=disable-wifi entry in /boot/config.txt. In order to safely access the Pi from outside my home network, I will be using NordVPN’s Meshnet. It is reminiscent of Hamachi, and enables one to bridge a LAN to the internet using a secure tunnel.
I use Nginx as a reverse proxy to access the Docker container Web UIs. More on this later.
Installing NordVPN
Using the instructions for Debian provided by NordVPN, I installed Nordvpn. Bundled with it comes a handy CLI. The only problem was logging in. Since we are headless, we need a little extra work after nordvpn login. The link provided by this command can be opened in a browser. After logging in, a blue Continue button emerges which hides a nordvpn:// link. This link needs to be provided to log in (note the quotes!):

Important: whitelisting the local LAN. In my case nordvpn whitelist add subnet 192.168.1.0/24 or you will be disconnected from the ssh session (trust me, I know) and there will be no way to regain access. After this, it is possible to run nordvpn connect and nordvpn set mesh on. You can go the extra mile with nordvpn set killswitch on to prevent any unencrypted traffic. Check if it worked with curl ipconfig.io/json.
Setting up Docker and Portainer
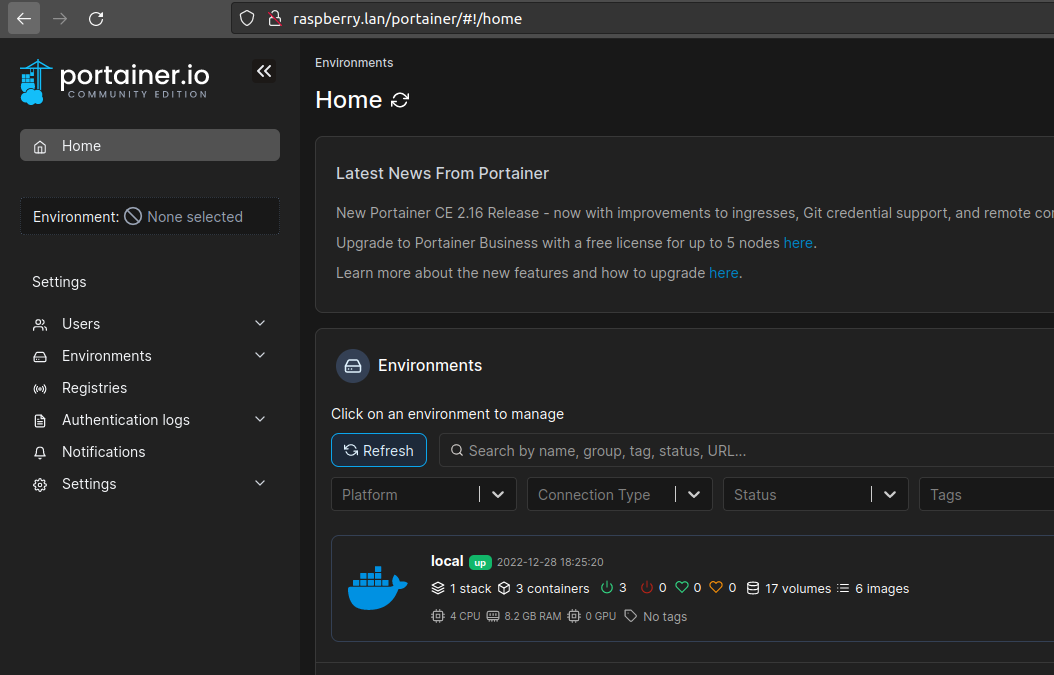
Following the official instructions, installing Docker was a breeze. With portainer, adding and monitoring deployments is made easy with the concept of ‘Stacks’. Following the Linux instructions, the GUI gives a visually appealing view to the workload on our Pi for the first time. Hurray!
 |
|---|
| Note: in the picture the workload is already deployed. We’ll get to that now. |
Setting up Plex and Qbittorrent with docker-compose
Now we can use the Portainer UI to deploy our Plex and Qbittorrent containers as a stack. I go to raspberry.lan:8000 to access the UI and add a docker-compose yaml of the following format:
version: "3.8"
services:
  plex:
    image: linuxserver/plex:latest
    container_name: plex
    restart: unless-stopped
    network_mode: host
    environment:
      - PUID=1000
      - PGID=1000
      - VERSION=docker
    volumes:
      - ${MEDIA_FOLDER}/Movies:/data/Movies:z
      - ${MEDIA_FOLDER}/Music:/data/Music:z
      - ${MEDIA_FOLDER}/Series:/data/Series:z

  qbittorrent:
    image: cr.hotio.dev/hotio/qbittorrent
    container_name: qbittorrent
    restart: unless-stopped
    environment:
      - PUID=1000
      - PGID=1000
      - TZ=Europe/London
      - WEBUI_PORT=8080

    volumes:
      - ${MEDIA_FOLDER}/Movies:/Movies:z
      - ${MEDIA_FOLDER}/Music:/Music:z
      - ${MEDIA_FOLDER}/Series:/Series:z
      - /home/pi/qbt_config:/config
    ports:
      - 8080:8080
      - 6881:6881
The hotio qbittorrent image comes with a nice (mobile-friendly) alternative web UI out of the box (at settings > web UI > alternative webUI set to /app/vuetorrent). For MEDIA_FOLDER the mount path of the USB disk is used. Note that the qbittorrent config is mapped to the home folder.
Reverse proxy
For additional ease of use, I want to forget about port numbers when accessing the qbt/Portainer URLs. A nginx reverse proxy is set up to enable this. I install nginx and make a file at /etc/nginx/sites-available/raspberry.lan.conf. I found a reverse proxy configuration at the qbt Git and put it in this conf file. Note that the last / at the proxy_pass entry is very important, or HTML pathing issues arise when the page is rendered. The proxy_cookie_path should be commented or login will fail and throw an SID cookie error (this is documented). On top of that, I added a simple entry for Portainer. Plex does not need an entry since it is accessible via app.plex.tv.
server {
        listen 80;
        server_name raspberry.lan;
        location /torrent/ {
          proxy_pass http://0.0.0.0:8080/;
          proxy_http_version 1.1;

          proxy_set_header   Host               0.0.0.0:8080;
          proxy_set_header   X-Forwarded-Host   $http_host;
          proxy_set_header   X-Forwarded-For    $remote_addr;
    #     proxy_cookie_path  /                  "/; Secure";
        }
        location /portainer/ {
          proxy_pass https://0.0.0.0:9443/;
          proxy_http_version 1.1;

          proxy_set_header   Host               0.0.0.0:9443;
          proxy_set_header   X-Forwarded-Host   $http_host;
          proxy_set_header   X-Forwarded-For    $remote_addr;
    }
}
Everything in its right place
Now Plex can be initialized by going to raspberry.lan:32400/web. The server can be given a name and the libraries mapped to locations on the mounted USB. The default download location for qbt can be set via the webUI to one of the mapped volumes, e.g. /Series. Rescan the Plex library after adding new media. Now everything is set to cast to for example a Chromecast. When trying to cast, there will be a redirect to app.plex.tv. For direct playback on a device, a Plex pass has to be bought per OS for 6 bucks.
 |
|---|
Torrent public domain movies from archive.org |
Using Plex from outside the network
Using Plex from outside the network can be enabled in various ways. Plex has a built-in solution, but with the NordVPN tunnel I can be sure I am the only one that has access to the LAN of my home address without usage of port forwarding. By using nordvpn mesh peer list, the hostname of the Pi is described at the top, accompanied by the IP of the .nord address. This .nord address should also be visible from any other NordVPN application. From any client device logged in with the same NordVPN account, this hostname can be used to route traffic over using the Meshnet functionality. With LAN discovery disabled in the client device, the Plex server should become visible when traffic is routed via the mesh over the Pi. Accessing the Plex library with LAN discovery enabled can also be done adding a manual connection in Plex. In the Android app this can be set under Settings > Advanced > Manual connections. The IP here is the mesh IP of the Pi, the port is 32400. Additionally, in Settings > Advanced > Allow insecure connections, set to On same network.
Notes
- The vuetorrent webUI leaves out some settings. To access these settings via the UI, temporarily disable the alternative webUI.
- The NordVPN client for Linux is quite buggy. For additional safety, it is wise to use a proxy directly in qBittorrent. See here for a how-to on the setup.
- Make sure the AV format (container/codec) is supported by the device that plays it. Otherwise, Plex will start transcoding which will make the little Pi sweat (and playback will probably stutter). Plex offers the option to ‘optimize’ files asynchronously so that de/encoding is not done on the fly, but this is very slow. Generally, use a device that is able to play HVEC content natively and has audio codec support as well. Even audio transcoding will make playback suffer. I use a Chromecast for Google TV 4k which works until I connect my wireless earbuds to the Chromecast, since my earbuds only support a limited amount of codecs.
- Routing traffic via the Pi could introduce a bottleneck to any traffic going to/from the device that is used. After consuming content from Plex remotely, it is best to connect to a ‘normal’ server again on the client.
 |
|---|
| Happy Plexing! |